「摸鱼」神器来了,Python 实现人脸监测制作神器
作者 | 李秋键
出品 | AI科技大本营(ID:rgznai100)
最近都在讨论工作摸鱼,网易云音乐也出了合理摸鱼时间表,今天给大家推荐如何用python实现摸鱼~码住呦!
引言:脸部表情是人类情绪的最直接外部表现之一和进行社交活动的重要方式,而赋予机器感知人类情绪的能力,使得机器可以识别人的情感状态,是实现人机交互的重要目标之一。随着人工智能的迅速发展,在过去十多年,科技工作者在人脸表情的自动识别领域进行了深入研究。人脸表情识别的研究在心理学、疲劳驾驶检测、课堂教学效果评价、智能医疗、公安测谎系统、车载安全系统等地方都受到广泛的关注。
在人脸识别的算法中,首先需要判定视频或图片中是否存在人脸,并定位人脸所处的位置。目前主要有基于知识和基于统计的两种人脸判定和定位方法。其中,基于知识的人脸检测定位主要是利用人脸器官特征和器官之间的几何关系来确定是否有人脸存在于图像中。基于统计的检测方式,则是利用过往照片中的像素分布和当前目标图片的像素分布是否相似来判定人脸。
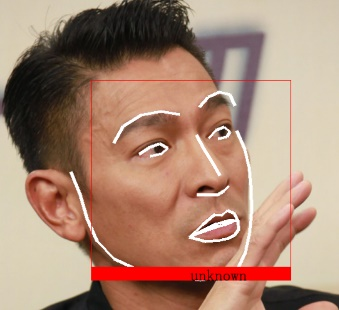
今天我们就将使用KNN算法实现人脸分类,并在分类的基础上实现监测。当检测到未进行训练过的人脸时,自动执行设定好的命名。在这里我们设为打开文档。即可形成我们的人脸检测“摸鱼”神器,或者及时遮挡祝自己的下巴,即可以执行程序。效果如下:

KNN人脸分类算法介绍
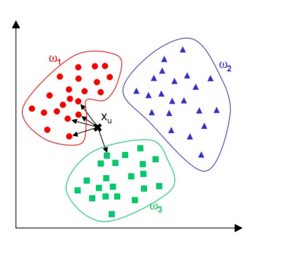
KNN算法是一种惰性学习算法,其思想是待分类样本的类别由其近邻的k个样本投票决定,已广泛应用于数据挖掘和数据分类中。在模式识别中,K近邻算法的优势在于简单且对异常值不敏感,泛化能力强。其核心内容:任意样本在数据集中的K个最相似样本中,如果大部分样本归并为某一类别,那么此样本也属于这个类别。其意义在于通过待测样本周边的已知数据类别来预测此样本的归属问题,极大弱化了数据集的高维度、高耦合给数据特征分析带来的困难。
其优点有:对数据噪声有较强的忍耐能力,非常适合零售业复杂多变的特征选择情景;分析数据特征时,只关注最相邻的K个样本即可,极大地降低了数据集的维度。
缺点:K近邻算法属于惰性算法,不能主动学习;K值的选择对数据分析的结果有影响.
基于kNN的人脸分类算法以异常人脸样本相较于正常工况样本会产生偏移量为根据,通过比较正常样本与异常样本在训练集中的前k个最近邻样本距离平方和判断是否为异常人脸。KNN人脸分类算法由模型建立和故障检测两部分组成。
1.1 模型建立
第一部分为模型建立。首先在训练集中确定每个样本的k个最近邻样本,然后计算每个样本到其k个最近邻样本的欧式距离平方和作为统计量。
1.2 ThreeDPoseUnityBarracuda介绍
第二部分为故障检测。首先在训练集中寻找待测样本x的前k个近邻,然后运用公式计算x与其k个近邻样本的欧式距离平方和。最后将平方和与标准的进行比较,若大于,则样本x为异常样本,否则为正常样本。
人脸特征提取
人脸特征提取这里使用的是face_recognition。Face Recognition 库主要封装了dlib这一 C++ 图形库,通过 Python 语言将它封装为一个非常简单就可以实现人脸识别的 API 库,屏蔽了人脸识别的算法细节,大大降低了人脸识别功能的开发难度。Face Recognition 库进行人脸识别主要经过几个步骤:人脸检测,找出所有的面孔;检测面部特征点:使用特征点矫正姿态,将侧脸转为正脸;给脸部编码:根据面部特征点计算这个面孔的特征值(特征向量)。
程序设计
这里程序的设计分为以下几个步骤,分别为数据集记录和制作、KNN人脸分类训练和检测异常执行程序。
3.1 人脸数据制作
这里我们简单采样1000个人脸样本,通过face_recognition提取人脸位置,并分割保存。代码如下:
facial_features = [ 'chin', 'left_eyebrow', 'right_eyebrow', 'nose_bridge', 'nose_tip', 'left_eye', 'right_eye', 'top_lip', 'bottom_lip' ]video_capture = cv2.VideoCapture(0)label="flase"num=0try: os.mkdir("img/"+label)except: passwhile True: ret,frame=video_capture.read() face_locations = face_recognition.face_locations(frame) face_landmarks_list = face_recognition.face_landmarks(frame) for face_location in face_locations: top, right, bottom, left = face_location if len(face_landmarks_list)==1: num+=1 face_image = frame[top:bottom, left:right] cv2.imwrite("img/"+label+"/"+str(num)+".jpg",face_image) print("保存第"+str(num)+"张人脸") cv2.imshow("test",face_image) cv2.waitKey(1) else: print("未能检测到人脸,或人脸数目不止一个,请保证只有一个人脸") if num == 1000: break cv2.destroyAllWindows()
3.2 KNN人脸分类
KNN对人脸进行分类,首先要遍历训练集中的每一个人脸样本,通过计算每个人脸编码之间的距离判断是否为正样本。其总程序结构如下图,即face_record记录人脸,face_recognition_knn训练人脸并监测,test为检测异常所要执行的脚本,这里已经打包成了exe文件。代码如下:
def train(train_dir, model_save_path=None, n_neighbors=None, knn_algo='ball_tree', verbose=False): X = [] y = [] for class_dir in os.listdir(train_dir): if not os.path.isdir(os.path.join(train_dir, class_dir)): continue for img_path in image_files_in_folder(os.path.join(train_dir, class_dir)): image = face_recognition.load_image_file(img_path) face_bounding_boxes = face_recognition.face_locations(image) if len(face_bounding_boxes) != 1:if verbose: print("Image {} not suitable for training: {}".format(img_path, "Didn't find a face" if len( face_bounding_boxes) < 1 else "Found more than one face")) else:X.append(face_recognition.face_encodings(image, known_face_locations=face_bounding_boxes)[0])y.append(class_dir) if n_neighbors is None: n_neighbors = int(round(math.sqrt(len(X)))) if verbose: print("Chose n_neighbors automatically:", n_neighbors) knn_clf = neighbors.KNeighborsClassifier(n_neighbors=n_neighbors, algorithm=knn_algo, weights='distance') knn_clf.fit(X, y) if model_save_path is not None: with open(model_save_path, 'wb') as f: pickle.dump(knn_clf, f) return knn_clfdef predict(X_img_path, knn_clf=None, model_path=None, distance_threshold=0.5): if knn_clf is None and model_path is None: raise Exception("Must supply knn classifier either thourgh knn_clf or model_path") if knn_clf is None: with open(model_path, 'rb') as f: knn_clf = pickle.load(f) X_img = X_img_path X_face_locations = face_recognition.face_locations(X_img) if len(X_face_locations) == 0: return [] faces_encodings = face_recognition.face_encodings(X_img, known_face_locations=X_face_locations) closest_distances = knn_clf.kneighbors(faces_encodings, n_neighbors=1) are_matches = [closest_distances[0][i][0] <= distance_threshold for i in range(len(X_face_locations))] return [(pred, loc) if rec else ("unknown", loc) for pred, loc, rec in zip(knn_clf.predict(faces_encodings), X_face_locations, are_matches)]
3.3 异常人脸行为执行
为了防止异常人脸持续执行动作造成电脑卡死,需要制定个GUI按钮,确保只持续执行一次,按确定按钮才会继续监测。以下代码分别包括了GUI界面的定义,主要也就只有一个按钮功能,按钮点击就会让异常程序恢复正常,而始终不会影响人脸检测程序。即本程序和人脸分类互不干扰。代码如下:
def get_window_positon(width, height): window_x_position = (window.winfo_screenwidth() - width) // 2 window_y_position = (window.winfo_screenheight() - height) // 2 return window_x_position, window_y_positionpos = get_window_positon(tk_width, tk_height) window.geometry(f'+{pos[0]}+{pos[1]}')def closewindow(): messagebox.showinfo(title="警告",message="请点击确定") returndef t(): try: os.remove("ok.txt") except: pass window.destroy()window.protocol("WM_DELETE_WINDOW",closewindow)bnt=Button(window,text="确定",width=15,height=2,command=t)bnt.pack()window.mainloop()if temp>num: if os.path.exists("ok.txt"): pass else: t2 = threading.Thread(target=test2) t2.start() os.system("1.jpg") f = open("ok.txt", "w") f.close() t1 = threading.Thread(target=test1) t1.start() for name, (top, right, bottom, left) in predictions: draw.rectangle(((left, top), (right, bottom)), outline=(0, 0, 255)) text_width, text_height = draw.textsize(name) draw.rectangle(((left, bottom - text_height - 10), (right, bottom)), fill=(0, 0, 255), outline=(0, 0, 255)) draw.text((int((left + right)/2), bottom - text_height - 10), name,font=myfont, fill=(0,0,0)) del draw pil_image = np.array(pil_image) temp = numelse: pil_image=img_pathdef test2(): os.system('1.caj')def test1(): os.system('test.exe')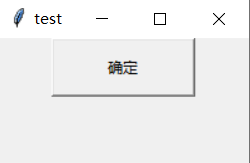
完整代码:
https://codechina.csdn.net/qq_42279468/face-monitor/-/tree/master
李秋键,CSDN博客专家,CSDN达人课作者。硕士在读于中国矿业大学,开发有taptap竞赛获奖等。

